Post-Install Event Configuration/Postback Overview
Kochava’s Post-Install Event Configuration/Postback UI has two main functions:
1. It allows you to manage the events you are sending to Kochava; that is, which of your post-install events, and all associated segmentation data, you want to send to Kochava.
2. It allows you to select which network/publisher(s) to send the post-install events to.
To access Post-Install Event Configuration/Postback UI
Key Steps:
1. Go to Kochava.com and Login
2. Select the app you want to configure for post-install events and/or postbacks.
3. Once inside the app, click the Configuration Tab.
4. You will land on the Post-Install Event Configuration page. (See below).
5. You will have several options located on the left side of the page:
· Create an Event
· Modify an Active Event
· Modify a Remapped Event
· Enable or delete an Inactive Event

Select an Active Event
Upon selecting an Active Event, you have 4 options (See image below):
· Remap
· Segmentation
· Disable
· Delete

1. Remap: Remapping allows you to forward your custom event in a generic form that is recognized by your partners' systems. This step is CRITICAL to the sending of post-install events to partners; the majority of 3rd party partners rely on very specific and generic naming conventions for the definition of the event and the event name.
To Perform Remap:
1. From the left menu, select the event you need to remap. The example below shows "gross_iap_txn".
2. From the drop down menu, select a generic event name that corresponds to your custom event. The example below shows "Purchase"
3. Select Remap in the bottom right corner to confirm.
When you confirm the remap:
· The current event (Called Purchase in the example below) will be disabled.
· All incoming data for the current event will be forwarded to the re-mapped event name selected,(Called Purchase in the below screen shots).

NOTE: If you want to remap to an event that is not listed in the Select Event drop down menu, you will need to Create an Event.
Create Event: Select the “Create an Event” tab at the top of the left-side menu
· Remap
· Segmentation
· Disable
· Delete
1. Remap: Remapping allows you to forward your custom event in a generic form that is recognized by your partners' systems. This step is CRITICAL to the sending of post-install events to partners; the majority of 3rd party partners rely on very specific and generic naming conventions for the definition of the event and the event name.
To Perform Remap:
1. From the left menu, select the event you need to remap. The example below shows "gross_iap_txn".
2. From the drop down menu, select a generic event name that corresponds to your custom event. The example below shows "Purchase"
3. Select Remap in the bottom right corner to confirm.
When you confirm the remap:
· The current event (Called Purchase in the example below) will be disabled.
· All incoming data for the current event will be forwarded to the re-mapped event name selected,(Called Purchase in the below screen shots).
NOTE: If you want to remap to an event that is not listed in the Select Event drop down menu, you will need to Create an Event.
Create Event: Select the “Create an Event” tab at the top of the left-side menu

You will land on the Create Event page. Either select a standard event, or create a custom one.
Standard Event
You will default to the standard setup, where you will see:
· A list of active events that are being delivered to the Kochava System.
· A list of Remapped events. These events names’ have been modified to better align with the expectations of 3rd party partners.
· A list of Inactive events that you have disabled.

2. Segmentation: This allows you to turn on/off event segmentation elements, such as levels completion, purchase order, sum, etc.

3. Disable: Disabling events will drop events at the server level. USE CAUTION! By doing this you will drop all incoming event data.

4. Delete: Deleting the event removes the event, all associated data and history. USE CAUTION!

· A list of active events that are being delivered to the Kochava System.
· A list of Remapped events. These events names’ have been modified to better align with the expectations of 3rd party partners.
· A list of Inactive events that you have disabled.
2. Segmentation: This allows you to turn on/off event segmentation elements, such as levels completion, purchase order, sum, etc.
3. Disable: Disabling events will drop events at the server level. USE CAUTION! By doing this you will drop all incoming event data.
4. Delete: Deleting the event removes the event, all associated data and history. USE CAUTION!
Event Postbacks:
Within the Event Postback UI, you will have the option to create a New Postback, which will enable Kochava to send event-specific postbacks to the 3rd party partners of your choice. Begin the setup/configuration process by selecting the “New Postback” button
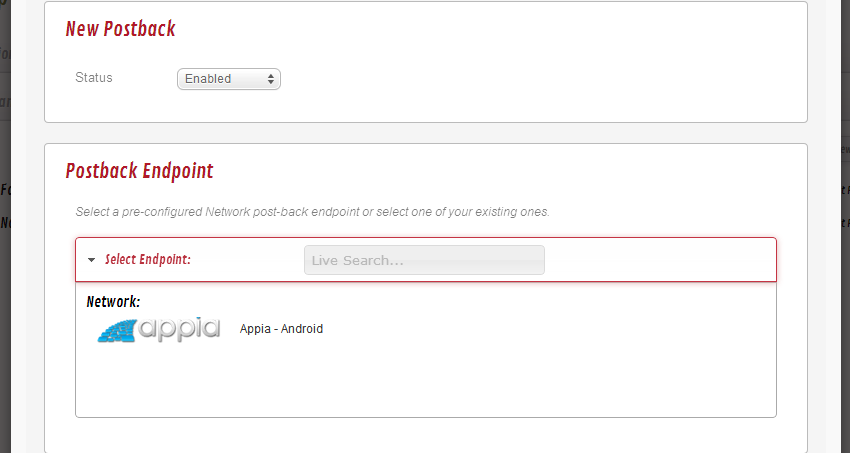
1. Status: After selecting the “New Postback” option, you can select the status of the Postback as either "Enabled" or "Disabled" (Image 1 below).
2. Postback Endpoint: Type or select Appia.
(Image 1 below)
3. Endpoint Settings: Enter in the unique endpoint settings provided by the selected partner
(Image 2 below)
4. Delivery Settings: You can choose to either send "Attributed Events" or "All Events" to the selected partner.
(Image 2 below)
5. Event Matching: You can select either "All Events" or select a specific event to send to the selected partner.
(Image 2 below)
Save the postback.
At any later point, you can modify the settings, disable the postback, or delete that specific postback.
Postback Image 1
Postback Image 2